
Sage Fixed Assets
Network Installation Guide
Last updated 8/24/2022
This is a publication of Sage Software, Inc.
© 2022 The Sage Group plc or its licensors. All rights reserved. Sage, Sage logos, and Sage product
and service names mentioned herein are the trademarks of The Sage Group plc or its licensors. All
other trademarks are the property of their respective owners.
Contents
Contents are now available from the Bookmarks panel, which you can access quickly from anywhere in
this PDF. Bookmarks are displayed automatically when you open the PDF from a download location on
your computer.
If you are viewing this guide in a web browser, you might need to turn on the bookmarks from the
toolbar in the PDF, depending on your browser. (For example, in Microsoft Edge, hover over the top of
the page to display the toolbar, and then click the Table of contents icon in the top left corner. In the
Chrome browser, you would click the Bookmarks icon in the top right corner.)
3
Sage Fixed Assets Network Installation Guide
Chapter 1 Introduction
This guide contains information that will get your application up and running as quickly as possible. It
includes information about installing these applications for the first time, as well as upgrading from a
previous version of each product.
After installation, your computer will have the following Sage Fixed Assets Network products:
l
Depreciation
l
Tracking
l
Planning
System Requirements
Before installing Sage Fixed Assets, review the System Requirements: Sage Fixed Assets Network Edition
article in the Sage Knowledgebase for the latest system requirements. The requirements listed are the
minimum requirements. As is true of most software programs, enhancing your hardware and system
software may improve performance.
Note: You can run Sage Fixed Assets Network on either a LAN (Local Area Network) or a WAN
(Wide Area Network); however, the Customer Support cannot troubleshoot problems with your
WAN.
Security Requirements
The person installing the program must have Administrative rights to the local computer.
After you install the server components, make sure that you share the SFAServ directory and not just its
subdirectories. During the installation of the network client, the client machine will need Read/Write access
to the SFAServ directory.
Contacting Us
Within Sage Fixed Assets, select Help > Sage Support to display a list of support options. Click to access
the product Knowledgebase, find product downloads and updates, or start a live chat session at
http://www.sagefixedassets.com/pegg.
1
Sage Fixed Assets Network Installation Guide
Chapter 2 Installing Sage Fixed Assets
Network Server
Preparing for a New Install
1.
Does each user of the application and each local system account have Modify rights access to the
SFAServ directory?
Full control is not required.
2.
Is the person performing the installation logged on as an Administrator?
You must have local Administrator rights to install the program.
3.
Are you running a supported operating system on the server? For more information, see “System
Requirements”, on page 1.
Overview of the Install Process
The install process consists of the following steps:
1.
Installing the Sage Fixed Assets network server components, on page 2.
2.
Locating the Default database, on page 6.
3.
Sharing the SFAServ folder, on page 6.
4.
Setting up the Attachments Folder for PDFs, on page 12.
5.
Optional: Installing the Sage Fixed Assets Reporting server, on page 13.
6.
Registering the application, on page 14.
7.
Optional: Mapping a drive to the SFAServ folder, on page 22.
Step 1: Installing the Sage Fixed Assets Network Server
Components
In this step, you install the server components on the server machine.
2
Sage Fixed Assets Network Installation Guide

Note: You must be on the server machine to install the server components. You cannot install the
server components from the client machine.
To install the Sage Fixed Assets network server components
1.
Sign in to Sage Support.
2.
Click My Downloads in the top right-hand corner of the page.
3.
Under Latest products, click the link for the latest version of the program.
4.
Click the Run button when prompted to either Run or Save the file. The system displays the Sage
Download Manager dialog.
5.
Click OK. The system begins to download the file. The system prompts you to install Sage Advisor
Update, Microsoft .NET Framework, and Microsoft Visual C++ 2015 Redistributable if it is not
already installed.
6.
Click the Install button. The system installs the required components, and then displays the
Welcome dialog. (You may need to restart your machine.)
7.
Click the Next button. The Software License Agreement dialog appears. Read the license
agreement, and then click the Yes button to accept the terms of the agreement. (If you do not accept
the terms of the license agreement, click the No button. The system exits from the installation
program.)
After you click the Yes button, the Choose Destination Location dialog appears.
8.
Select the folder in which to install the server components, and then click the Next button. The
Sybase Server Configuration Information dialog appears.
3
Sage Fixed Assets Network Installation Guide

l
Database Engine Name
We recommend that you accept the default Database Engine name of SFA_Engine unless you
are using a different Sybase database engine name.
Note: This field is unavailable if you have already installed a Sage Fixed Assets network
server application on this machine. You will use the same Database Engine name that
was used in the previous installation.
l
Protocol
We recommend that you make a note of the communication protocol information. The
selected protocol must match the communication protocol that you specify when you establish
the network Database server.
9.
Click the Next button. The system begins installing the software, and the Setup Status dialog
4
Sage Fixed Assets Network Installation Guide

appears.
10.
Click OK. The InstallShield Wizard Complete dialog appears.
11.
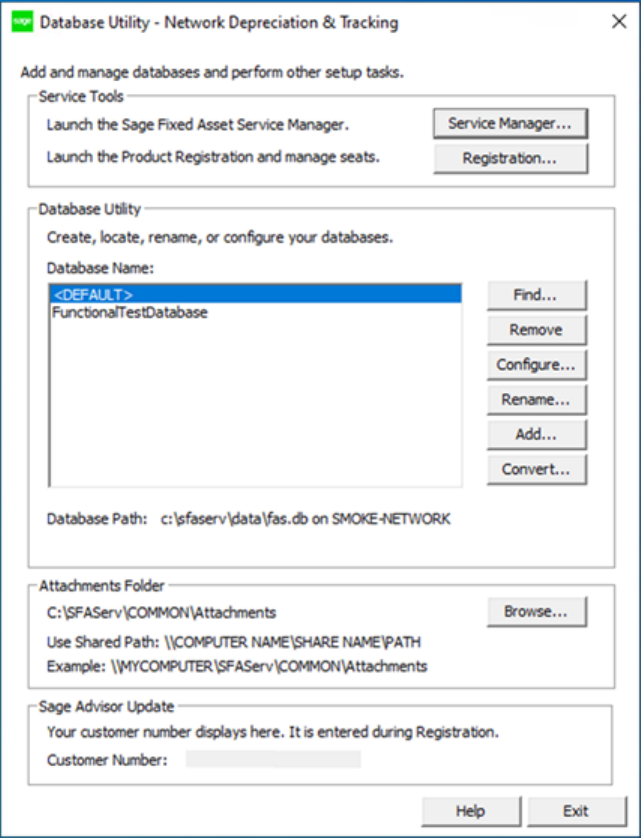
Click the Finish button. The system displays the Database Utility dialog.
l
You MUST specify a UNC path for the attachments folder for PDF files attached to images
12.
The Customer Number field in the Sage Advisor Update section remains blank until you register the
product. After registering, the Customer Number field will be populated once the Database Utility
dialog is closed and re-opened.
The database engine must be started before you can run the network client on a local workstation.
5
Sage Fixed Assets Network Installation Guide
The installation program automatically creates a database service called Sage Fixed Assets Service. The
installation program starts this service for you.
Step 2: Locating the Default Database
In this step, you use the Database Utility to add the default asset database to the system. Once the default
asset database has been added, you will not have to add it again for any other clients.
To add the default database
1.
Click the Find button on the Database Utility. The Find Databases dialog appears.
2.
Click the Browse button. The Browse for Folder dialog appears.
3.
Use the directory tree to locate the folder containing the default database.
The installation program installed a default database in the F:\SFAServ\DATA directory on the
server, if you accepted the default directory when you installed the database server files.
4.
Click OK to return to the Find Databases dialog.
5.
Click the Search button. The system lists all of the databases that it finds in the list box.
6.
Select (highlight) the database that you want to use, and then click the Add button. The selected
database disappears from the list of search results after it has been added.
7.
Click the Close button. The system returns to the Database Utility dialog. The selected database
appears in the Database Name field.
Step 3: Sharing the SFAServ Folder
The next step is to share the \SFAServ folder for the following users or groups:
l
Users of the Sage Fixed Assets application with Modify rights
l
Domain Administrators with Full Control
l
Local operating SYSTEM group with Full Control
Steps for sharing a folder on Windows Server
1.
In Windows Explorer, right-click on the SFAServ folder.
2.
From the popup menu, select Properties. The SFAServ Properties dialog appears.
3.
Click the Sharing tab.
6
Sage Fixed Assets Network Installation Guide
4.
Click the Advanced Sharing option button.
5.
Select the Share this folder option.
6.
Enter a name for the share in the Share name field.
7
Sage Fixed Assets Network Installation Guide
7.
Click the Permissions button.
8
Sage Fixed Assets Network Installation Guide
8.
Click Add.
9.
Enter SYSTEM. Click Check Names.
9
Sage Fixed Assets Network Installation Guide
10.
Give Full control. Click Apply then OK.
10
Sage Fixed Assets Network Installation Guide
11.
Click Apply then OK.
11
Sage Fixed Assets Network Installation Guide
12.
Check the Security tab and verify that System has Full Control. Click Close. If the Sybase engine is
currently running, it will need to be stopped and started for the changes to take effect.
Step 4: Setting Up the Attachments Folder for PDFs
You can use the Images tab in Asset Detail to attach an image to an asset. The application stores most
types of image files in the asset database. However, the application stores Adobe PDF file attachments in a
separate folder.
The application creates an Attachments folder during installation. You can find it under
C:\SFAServ\COMMON on the server machine.
Note: You must specify the path to this folder or to another folder in the Attachments field on the
Database Utility.
12
Sage Fixed Assets Network Installation Guide

Setting up the attachments folder
1.
On the Database Utility, click the Browse button. The Browse for Folder dialog appears.
2.
Select (or create) the folder that will contain the Adobe PDF file attachments. The directory path
must appear in the format \\COMPUTER NAME\SHARE NAME\folder path. For example, if the
computer name is “MYCOMPUTER” and the share name of the SFAServ folder is “SFAServ,” then
the path to the existing attachments folder would appear as:
\\MYCOMPUTER\SFAServ\COMMON\Attachments.
3.
Enter this path in the Folder field of the Browse for Folder dialog.
4.
Click OK to close the Browse for Folder dialog. The selected folder appears in the Attachments
Folder field.
5.
Enter your customer number in the Customer Number field within the Sage Advisor Update section
to receive update notifications. You can find the customer number on the packing slip. If you cannot
find your customer number, start a live chat session with customer service at
http://www.sagefixedassets.com/pegg.
6.
Click the Exit button to close the Database Utility.
Optional Step: Editing the Config File
This step is recommended in network environments in which the Sage Fixed Assets Server and the client
workstation(s) are located on different subnets.
To edit the config file
1.
Using a text editor (such as Notepad), open the INSTALL.CFG file. It is located in the folder where
the Sage Fixed Assets Server components were installed (default folder is SFAServ) on the server
machine.
2.
In the PARAMETERS line, change XXX.XXX.XXX.XXX to the IP address of the server machine.
3.
Save the file.
Step 5: Installing the Sage Fixed Assets Reporting Server
Components (Optional)
Sage Fixed Assets Reporting enables you to create custom reports. It is a powerful program that allows
you to design, create, print, and distribute your custom reports.
13
Sage Fixed Assets Network Installation Guide
Note: The Sage Fixed Assets Reporting program uses SAP® Crystal Reports 2016 (Crystal
Reports), which requires 2 GB of hard disk space. Sage Fixed Assets Reporting may not be
compatible with other versions of Crystal Reports. Before installing Sage Fixed Assets Reporting,
we recommend that you make sure version Crystal Reports 2016 is compatible with your other
applications that run Crystal Reports.
In this step, you install the Sage Fixed Assets Reporting server on the server machine. This step is
optional. You should install the Sage Fixed Assets Reporting server only if you have purchased Sage Fixed
Assets Reporting, or you want to explore its features on a 30-day, free trial basis.
To install the Sage Fixed Assets Reporting server components
1.
Sign in to Sage Support.
2.
Click My Downloads in the top right-hand corner of the page.
3.
Under Latest products, click the link for the latest version of the program.
4.
Click the Run button when prompted to either Run or Save the file. The system displays the Sage
Download Manager dialog.
5.
Click the Run button when prompted to either Run or Save the file. The system displays the Sage
Download Manager dialog.
6.
Click OK. The system begins to download the file. The system automatically displays the Sage Fixed
Assets Reporting Server Welcome dialog. Click the Next button the Software License Agreement
dialog appears.
7.
Read the license agreement, and then click the Yes button to accept the terms of the agreement. (If
you do not accept the terms of the license agreement, click the No button. The system exits from the
installation program.)
For instructions on installing the Sage Fixed Assets Reporting client components, see Chapter 7,
“Installing Sage Fixed Assets Reporting”, on page 42.
Step 6: Registering the Application
Registering your application provides the following benefits:
l
Simplifies the activation of your product which must be done before use.
l
Automatically updates subscriptions, eliminating the need to manually enter registration codes.
l
Provides immediate access to newly ordered products.
14
Sage Fixed Assets Network Installation Guide
After you have installed the database server and the network client, follow the steps below to register the
network application.
Note: Sage recommends activating and registering your product within 30 days from the order date.
To register a product
Note: Before you perform the steps below, make sure the database engine has been started. The
installation program should have started the database engine automatically. However, you must
start the database engine if it has been stopped for any reason. The database engine must be
running when you register the program. For instructions on starting the database engine, see
“Managing a Sage Fixed Assets Database Service”, on page 51.
Note: Use the following steps for both the Database Utility - Network Depreciation & Tracking and
the Database Utility - Network Planning:
1.
On the server machine, click the Start button on the Windows taskbar, and then select Programs (or
All Programs) from the Start menu.
2.
Select the Sage Fixed Assets program group.
3.
Select the Tools program group.
4.
Select the Database Utility Network icon for the Database Utility - Network Depreciation & Tracking
or the Database Utility - Network Planning and the Database Utility dialog appears.
5.
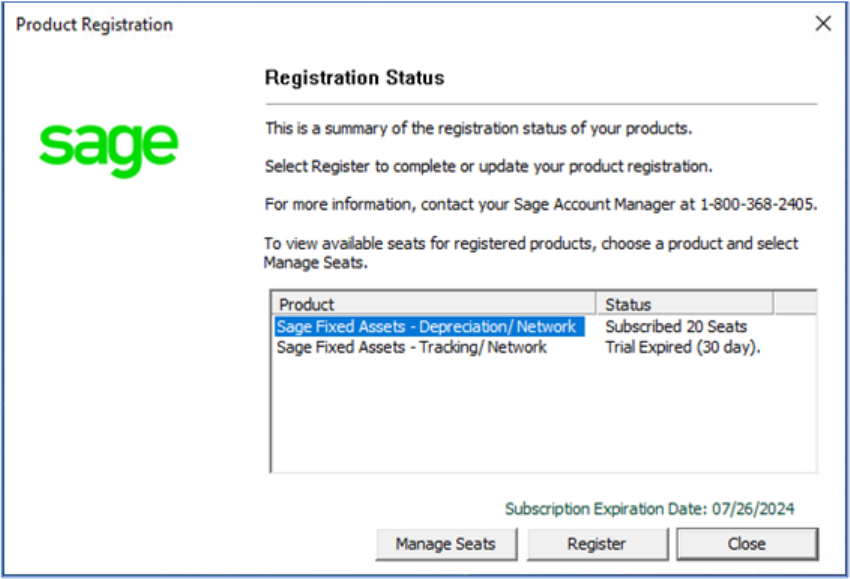
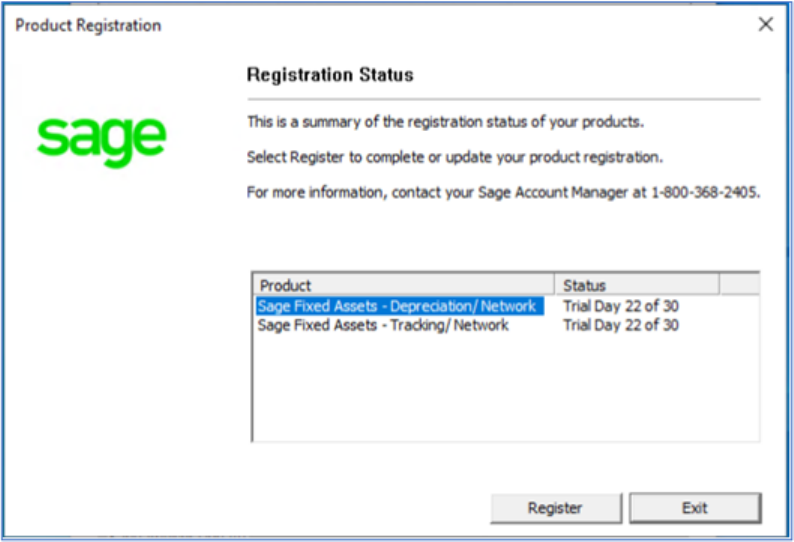
Click the Registration button. The Registration Status dialog similar to the one shown below
appears.
15
Sage Fixed Assets Network Installation Guide
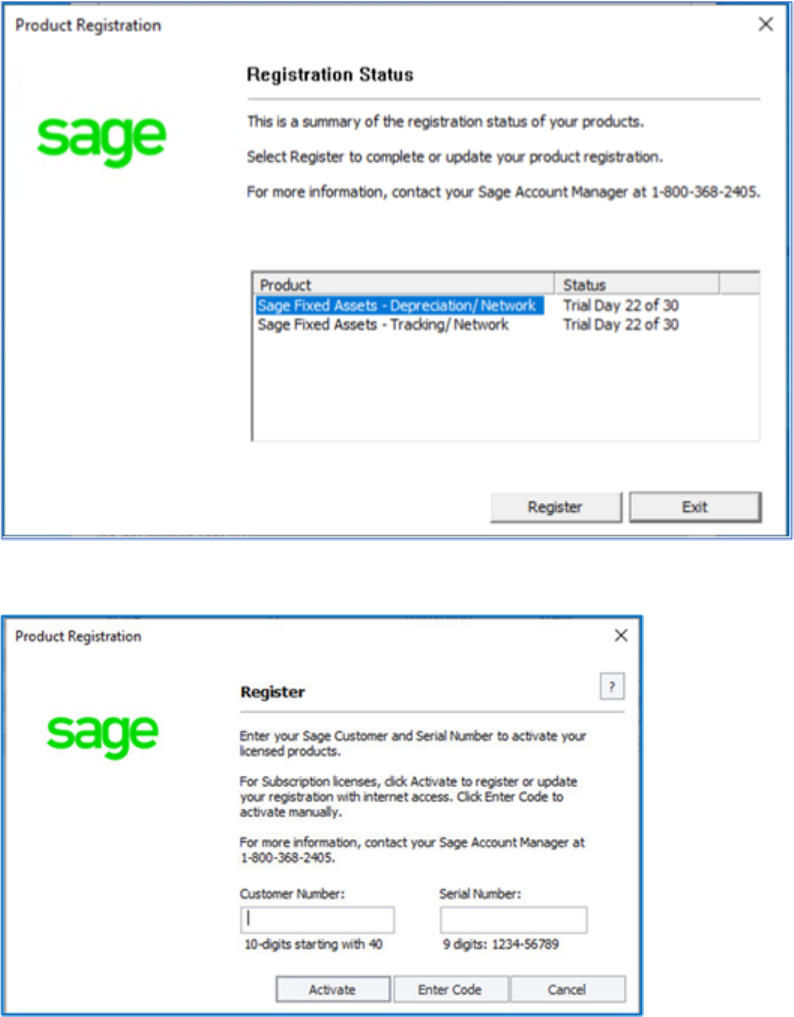
6.
Click the Register button. The Register dialog opens.
7.
Enter your customer number in the Customer Number field and serial number in the Serial
Number field.
16
Sage Fixed Assets Network Installation Guide
Note: If you cannot find your Customer Number, Serial Number, Activation Code, or
Unlocking Code (subscription only), they are available in several places:
- In the email from Sage confirming your Sage Fixed Assets order.
- On the invoice for your Sage Fixed Assets order.
- From your Sage Account Manager at 1-800-368-2405.
You will need your Customer Number when contacting Sage for assistance.
8.
To automatically register your product [internet connection required], click the Activate button. A
Registration Succeeded message displays after a few moments.
9.
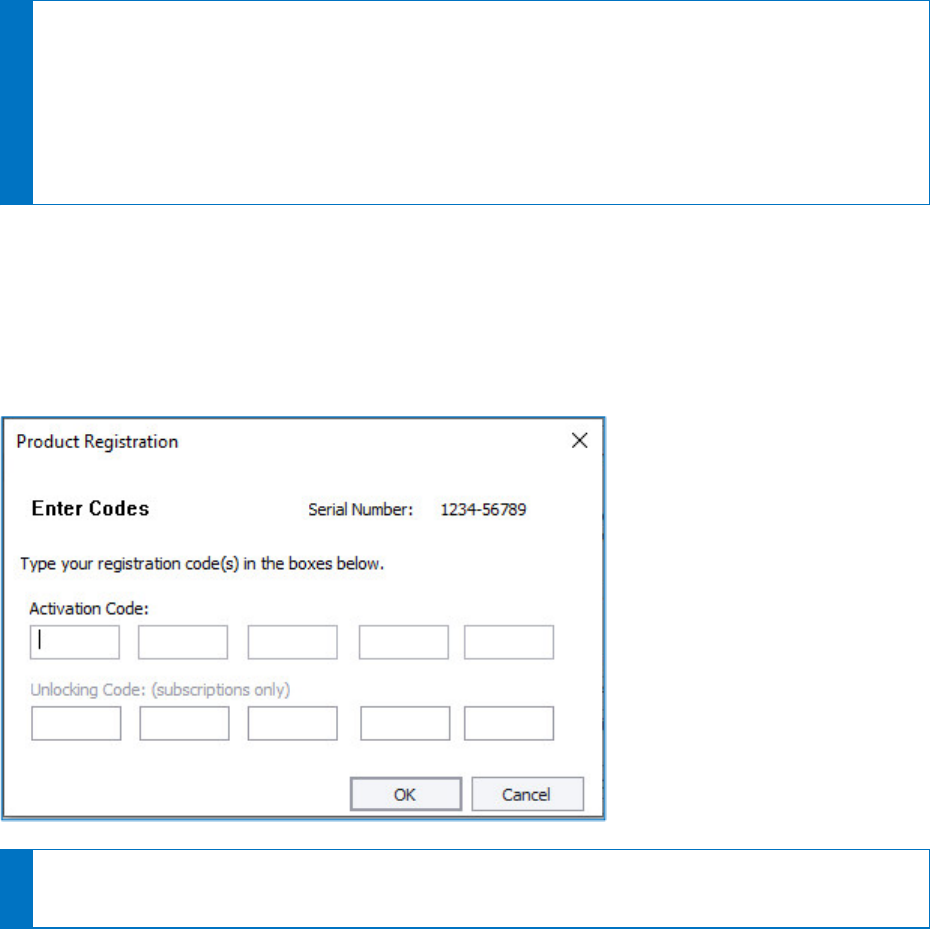
To manually register your product, click Enter Code to manually register your product by entering
your Activation Code and Unlocking Code (subscription only) using the Enter Codes dialog. Click
OK.
Note: If you are a subscription customer, the Unlocking Code field will become enabled after
entering your Activation Code.
10.
The Registration Status dialogs displays showing your registration.
a.
Subscription customers will see a status of “Subscribed” and the subscription expiration date
at the bottom right-hand corner.
b.
All other customers will see a status of “Purchased”.
17
Sage Fixed Assets Network Installation Guide
11.
Click Close.
Using an Expired Subscription
If your subscription expires, a message displays when you open your product indicating that you have a
30-day grace period to continue to use all features in the program. After 30 days, the 120-day read-only
period begins. For up to 120 days, you can continue to use these features:
Open Company, Custom
Export, Excel Export, Open/Print Reports, and Print Asset List
. If you exceed the 120-day read-only
period, a message displays when you open your product. Follow the steps in “To Register a product”
above to register.
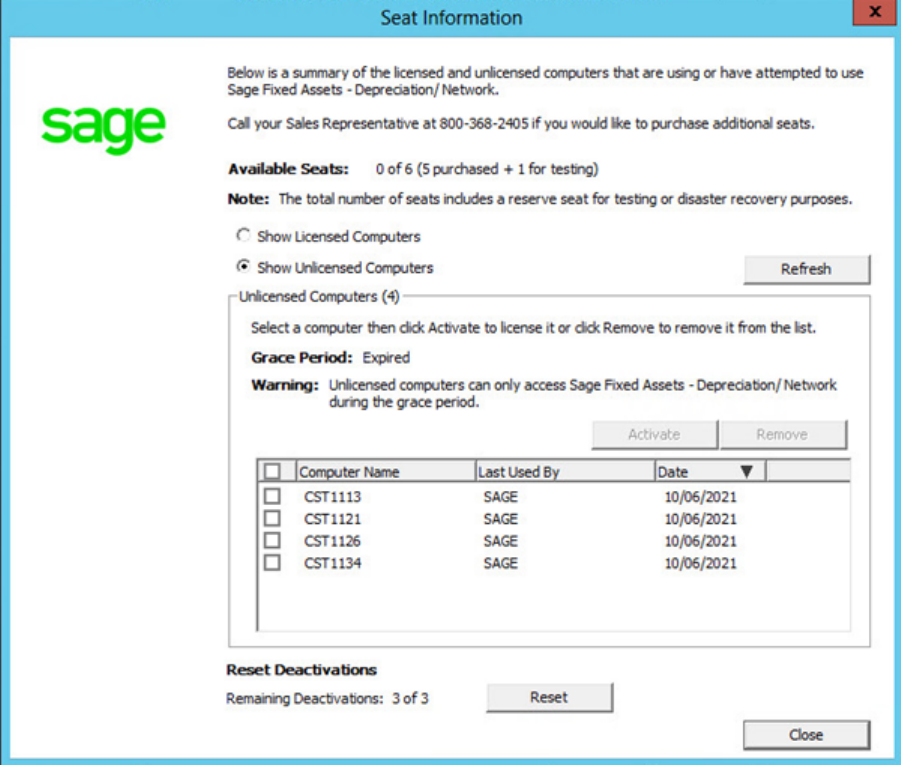
Managing Seats
The Seat Information window allows you to view your seat and grace period information, to activate an
unlicensed computer, or to deactivate a licensed computer. Deactivation is useful for situations such as
employee turnover or if an employee gets a new computer.
Understanding the grace period
Depreciation and Tracking have a seven-day, company-wide grace period for unlicensed computers. If
your seat count is exhausted and an unlicensed user signs in, they can choose to continue (which
18
Sage Fixed Assets Network Installation Guide
automatically starts the grace period) or cancel. The grace period cannot be extended and does not reset
per user. Unlicensed computers cannot access the program after the grace period expires.
To activate an unlicensed computer
1.
On the server machine, click the Start button on the Windows taskbar, and then select Programs (or
All Programs) from the Start menu.
2.
Select the Sage Fixed Assets program group.
3.
Select the Tools program group.
4.
Select the Database Utility Network icon. The Database Utility dialog appears.
5.
Click the Registration button. The Registration Status dialog similar to the one shown below
appears.
6.
Click the Manage Seats button. The Seat Information dialog appears.
19
Sage Fixed Assets Network Installation Guide

7.
Verify that you have an available seat in the Available Seats field.
8.
Click Show Unlicensed Computers to filter the list.
9.
Select the computer you want to activate.
10.
Click Activate. Sage Fixed Assets moves the computer to the Licensed Computers list and your seat
count is reduced by one.
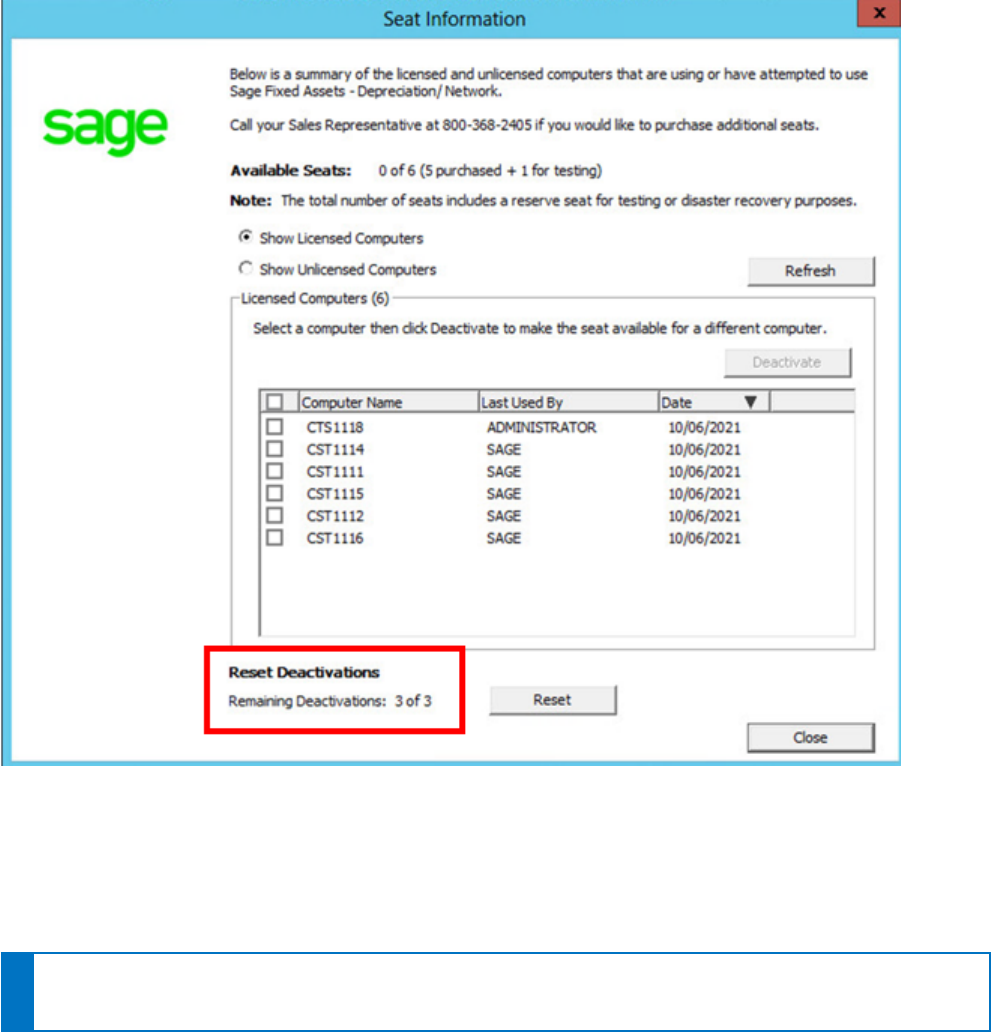
To deactivate a licensed computer
1.
Open the Seat Information dialog.
2.
Click Show Licensed Computers to filter the list.
3.
Select the computer you want to deactivate.
20
Sage Fixed Assets Network Installation Guide
4.
Click Deactivate. Sage Fixed Assets increases your available seat count by one and reduces the
number of Remaining Deactivations by one.
To remove an unlicensed computer
1.
Click Show Unlicensed Computers to filter the list.
2.
Select the computer you want to remove.
3.
Click Remove to remove it from the Unlicensed Computers list.
To reset deactivations
Each Sage Fixed Assets installation has a set number of deactivations according to how many seats are on
your license. If you use all of your deactivations, you can click Reset in the Reset Deactivations section at
the bottom of the on the Seat Information window then follow the instructions to request a reset code.
21
Sage Fixed Assets Network Installation Guide
Step 7: Mapping a Drive to the SFAServ Folder (Optional)
Now that you have shared the SFAServ folder, you can map a network drive to that directory on each
workstation.
Note: Instead of mapping a drive to the SFAServ folder, you can install the client components by
entering the UNC path (\\Servername\Foldername) in the Run dialog on the client machine.
22
Sage Fixed Assets Network Installation Guide
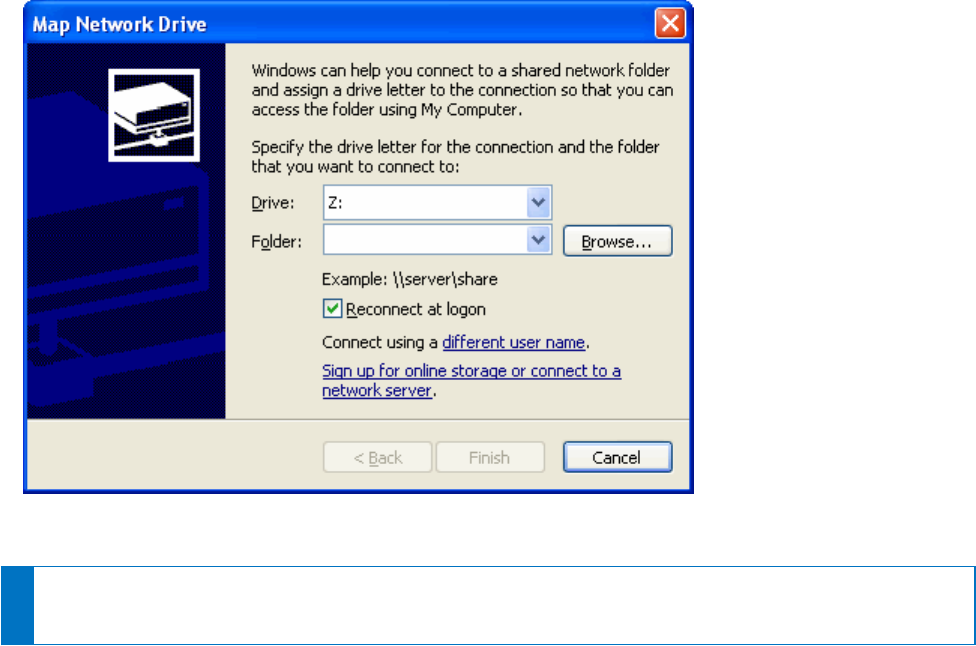
To map a drive to the SFAServ folder
1.
In Windows Explorer, select Tools/Map Network Drive. The Map Network Drive dialog appears.
2.
Click the Browse button to locate the SFAServ folder on the server.
Note: Do NOT map a drive to a folder underneath the SFAServ folder, such as the Network Setup
folder.
3.
Click the Finish button to close the Map Network Drive dialog.
23
Sage Fixed Assets Network Installation Guide

Chapter 3 Installing Sage Fixed Assets
Network Clients
Preparing for a New Install
1.
Does each user of the application have Modify rights and each local system account have full control
access to the SFAServ directory?
To run the application, each network user must have full control access to the SFAServ directory.
After the application has been installed, make sure the SFAServ directory has the correct
permissions.
2.
Is the person performing the installation logged on as an Administrator? You cannot install the
program if you do not have Administrative rights.
3.
Are you running a supported operating system on the server? For more information, see the System
Requirements: Sage Fixed Assets Network Edition article in the Sage Knowledgebase.
Step 1: Installing the Client Components
Follow the steps below on each workstation on which you will run the network application. You can also
install the client application on the server for testing purposes.
To install a client on a workstation
1.
Do one of the following:
l
Go to My Computer and browse to the network drive that you mapped in the previous step.
Locate the folder in which you installed the server components (SFAServ is the default) and
double-click the SETUP.EXE file in the Network Client subfolder.
l
Select Start/Run from the Windows taskbar. The Run dialog appears. In the Run dialog, enter
the UNC path (\\Servername\Foldername) to the folder containing the server components.
l
In the Run dialog, enter the mapped drive path to the folder (for example,
Z:\SFAServ\Network Client\SETUP.EXE.
(Substitute your network drive letter for “Z” if it is different.)
24
Sage Fixed Assets Network Installation Guide
Note: If you mapped the Z: drive to \SFAServ, then the path would be: Z:\Network
Client\SETUP.EXE.
Note: The SETUP.EXE file is located on the machine on which you installed the server components.
2.
Click OK.
3.
The system begins to download the file. The system prompts you to install Sage Advisor Update,
Sage SBDDesktop, Microsoft .NET Framework, and Microsoft Visual C++ 2015 Redistributable if it is
not already installed.
4.
The system installs the required components, and then displays the Welcome dialog. (You may
need to restart your machine.)
5.
Click the Next button. The License Agreement dialog appears.
6.
Read the license agreement, and then click the Yes button to accept the terms of the agreement. (If
you do not accept the terms of the license agreement, click the No button. The system exits from the
installation program.)
7.
After you click the Yes button, the Choose Destination Location dialog appears.
8.
Select the location for the client components, and then click the Next button. The system begins
installing the software, and the Setup Status dialog appears.
When all of the files have been installed, the InstallShield Wizard Complete dialog appears.
If the installation program determines that you need to restart your computer before you use the
program, it displays two options on the InstallShield Wizard Complete dialog. You can either allow the
system to restart your computer immediately, or you can restart your computer at a later time.
Tip: We recommend that you allow the system to restart your computer at this time if you are
prompted to do so.
9.
Click the Finish button.
Step 2: Starting the Application
Follow the steps below to start the network application from a workstation.
25
Sage Fixed Assets Network Installation Guide
To start the application from a workstation
1.
Launch a Sage Fixed Assets product by doing one of the following:
a.
Double-click the product icon from your desktop.
b.
Click the Start button (Windows icon) on the Windows taskbar and select the Sage Fixed
Assets program group. Select the icon for the desired product.
2.
The Update User Information dialog appears (for Depreciation and Tracking products).
3.
Complete the Update User Information dialog, and then click OK.
4.
The system opens the application and displays the main window.
Finding your customer number
Your customer number is available in several places:
l
In the email from Sage confirming your Sage Fixed Assets order.
l
On the invoice for your Sage Fixed Assets order.
l
On the Register Window (Help > Registration > Register) if you have previously registered.
l
From your Sage Account Manager at 800-368-2405.
After your system administrator has registered your product, your customer number can also be found at
Help > Update User Information.
You will need your Customer Number when contacting Sage for assistance.
26
Sage Fixed Assets Network Installation Guide
Chapter 4 Upgrading Sage Fixed Assets
Network Server
This chapter provides instructions for upgrading the server from a previous version of Sage Fixed Assets.
Previous Versions Compatible with the Latest Version
You must be currently using the prior Midyear release or the prior Tax Update release of Sage Fixed
Assets to follow the steps in this chapter. If you are not, install prior releases in sequential order through the
compatible version before you upgrade.
Preparing for an Upgrade
1.
Is the person performing the installation logged on as an Administrator? You cannot install the
application unless you have Administrative privileges.
2.
Have you backed up your existing data using the application’s backup utility? (To back up your data,
select File/Company Utilities/Backup Company from the menu bar.) Note the location of the backup.
Overview of the Upgrade Process
The upgrade process consists of the following steps:
1.
Backing up your current data, on page 28.
2.
Upgrading the Sage Fixed Assets network server components, on page 29.
3.
Setting up the attachments folder for PDFs, on page 31.
4.
Optional: Installing the Sage Fixed Assets Reporting server, on page 32.
5.
Converting your current data, on page 33.
27
Sage Fixed Assets Network Installation Guide
Step 1: Backing Up Your Data
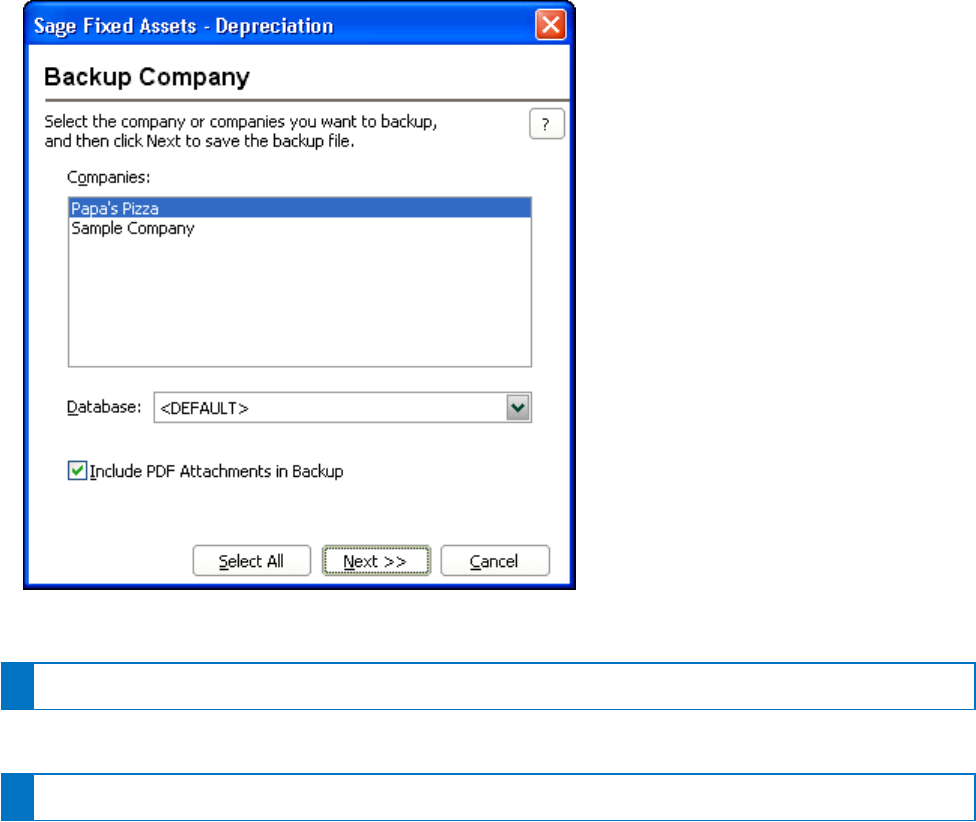
To back up your data
1.
Select File/Company Utilities/Backup Company from the menu bar. The Backup Company dialog
appears.
2.
Select the database containing the company or companies you want to back up.
Note: You can repeat these steps and select a different database if you have multiple databases.
3.
Select the company or companies that you want to back up, and then click the Next button.
Note: Click the Select All button to select all of the companies listed in the Companies field.
4.
A dialog that allows you to name and save the backup file appears.
5.
Enter a file name and select a location for the backup file, and then click the Backup button. The
application saves the backup file and returns to the Backup Company dialog.
6.
After the backup is complete, click the Cancel button to close the Backup Companies dialog, or
select another company to back up.
28
Sage Fixed Assets Network Installation Guide
Step 2: Upgrading the Sage Fixed Assets - Network Server
Components
In this step, you install the server components on the server machine.
Note: You must be on the server machine where the previous server components were installed to
upgrade the server components. You cannot install the server components from the client machine.
To upgrade the Sage Fixed Assets server components
1.
Sign in to Sage Support.
2.
Click My downloads and updates in the top right-hand corner of the page.
3.
Under Latest products, click the link for the latest version of the program.
4.
Click the Run button when prompted to either Run or Save the file. The system displays the Sage
Download Manager dialog.
5.
Click OK. The system begins to download the file.
The system prompts you to install Sage Advisor Update and Microsoft .NET Framework and
Microsoft Visual C++ 2015 Redistributable if it is not already installed.
6.
Click the Install button. The system installs the required components, and then displays the
Welcome dialog. (You may need to restart your machine.)
7.
Click the Next button. The Software License Agreement dialog appears. Read the license
agreement, and then click the Yes button to accept the terms of the agreement. (If you do not accept
the terms of the license agreement, click the No button. The system exits from the installation
program.)
After you click the Yes button, a message appears indicating that a previous version of the program
has been found on your computer.
Note: If this message does not appear, make sure you are installing the server components on the
machine where the previous Sage Fixed Assets server components were installed.
8.
Click Yes to remove the previous version of the application. The system begins installing the
software, and the Setup Status dialog appears.
9.
Click OK. The InstallShield Wizard Complete dialog appears.
10.
Click the Finish button. The system displays the Database Utility dialog.
29
Sage Fixed Assets Network Installation Guide
11.
The database engine must be started before you can run the network client on a local workstation.
The installation program automatically creates a service called Sage Fixed Assets Service. The
installation program starts this service for you.
Optional Step: Editing the Config File
This step is recommended in network environments in which the Sage Fixed Assets Server and the client
workstation(s) are located on different subnets.
30
Sage Fixed Assets Network Installation Guide

To edit the config file
1.
Using a text editor (such as Notepad), open the INSTALL.CFG file. It is located in the folder where
the Sage Fixed Assets Server components were installed (default folder is FASServ) on the server
machine.
2.
In the PARAMETERS line, change XXX.XXX.XXX.XXX to the IP address of the server machine.
3.
Save the file.
Step 3: Setting Up the Attachments Folder for PDFs
You can use the Images tab in Asset Detail to attach an image to an asset. The application stores most
types of image files in the asset database. However, the application stores Adobe PDF file attachments in a
separate folder.
The application creates an Attachments folder during installation. You can find it under
C:\SFAServ\COMMON on the server machine. You must specify the path to this folder or to another folder
in the Attachments field on the Database Utility.
Note: Make sure the folder that you select is either shared or underneath a shared folder.
Setting up the Attachments Folder
1.
On the Database Utility, click the Browse button. The Browse for Folder dialog appears.
2.
Select (or create) the folder that will contain the Adobe PDF file attachments. The directory path
must appear in the format \\COMPUTER NAME\SHARE NAME\folder path. For example, if the
computer name is “MYCOMPUTER” and the share name of the SFAServ folder is “SFAServ,” then
the path to the existing attachments folder would appear as:
\\MYCOMPUTER\SFAServ\COMMON\Attachments.
3.
Enter this path in the Folder field of the Browse for Folder dialog.
4.
Click OK to close the Browse for Folder dialog. The selected folder appears in the Attachments
Folder field.
31
Sage Fixed Assets Network Installation Guide
Note: If you have already registered your product and entered your customer number, your
customer number is populated in the Sage Advisor Update section. If you have already
registered your product and entered your customer number, your customer number is
populated in the Sage Advisor Update section. If you just need to update your Customer
Number or have not registered, go to Database Utility> Tools > Registration, then click
Register on the Registration Status dialog to complete the registration.
For more information about registration and where to find your Customer Number, see
Registering the application, on page 14.
5.
Click the Exit button to close the Database Utility.
Step 4: Installing the Sage Fixed Assets Reporting Server
Components (Optional)
Sage Fixed Assets Reporting enables you to create custom reports. It is a powerful program that allows
you to design, create, print, and distribute your custom reports.
Note: The Sage Fixed Assets Reporting program uses SAP® Crystal Reports 2016 (Crystal
Reports), which requires 2 GB of hard disk space. Sage Fixed Assets Reporting may not be
compatible with other versions of Crystal Reports. Before installing Sage Fixed Assets Reporting,
we recommend that you make sure version Crystal Reports 2016 is compatible with your other
applications that run Crystal Reports.
In this step, you install the Sage Fixed Assets Reporting server on the server machine. This step is
optional. You should install the Sage Fixed Assets Reporting server only if you have purchased Sage Fixed
Assets Reporting, or you want to explore its features on a 30-day, free trial basis.
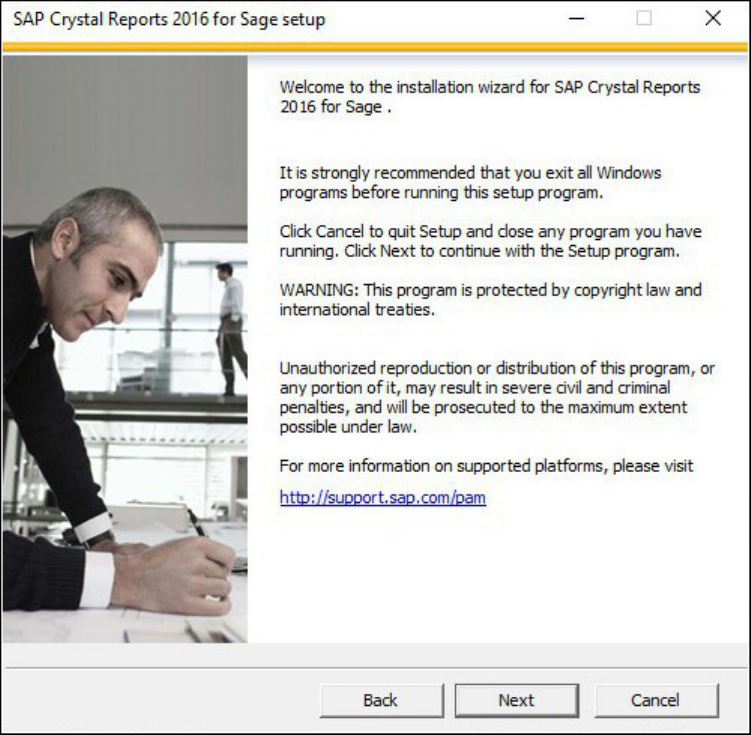
To install the Sage Fixed Assets Reporting server components
1.
Sign in to Sage Support.
2.
Click My Downloads in the top right-hand corner of the page.
3.
Under Latest products, click the link for the latest version of the program.
4.
Click the Run button when prompted to either Run or Save the file. The system displays the Sage
Download Manager dialog.
5.
Click OK. The system begins to download the file. Then the system automatically displays the Sage
Fixed Assets Reporting Server Welcome dialog.
6.
Click the Next button. The Software License Agreement dialog appears. Read the license
32
Sage Fixed Assets Network Installation Guide

agreement, and then click the Yes button to accept the terms of the agreement. (If you do not accept
the terms of the license agreement, click the No button. The system exits from the installation
program.)
For instructions on installing the Sage Fixed Assets Reporting client components, see "Chapter 7,
Installing Sage Fixed Assets Reporting", on page 42.
Step 5: Converting Your Current Data
As new features and enhancements are added to the program, the system requires additional information
to support the new features. This requires that changes be made to your existing asset database so that
the system can store the new information. To update your database, you perform a database conversion.
Note: A database conversion may not be required for the current release. If the program launches
and does not prompt you to perform the In-Place Database Conversion, a conversion is not needed
for the current database. If it does prompt you for conversion, you can continue and convert the
current database, or cancel to use the Database Conversion Utility to convert multiple databases. A
database conversion requires four times the size of each database of disk space for each database
being converted.
To convert your data
1.
Click the Start button on the Windows taskbar, and then select Programs (or All Programs) from the
Start menu.
2.
Select the Sage Fixed Assets program group.
3.
Select the Tools program group.
4.
Select the Database Utility Network icon. The Database Utility dialog appears.
5.
Click the Convert button.
If the system cannot connect to the system database, the Verify Database Connection dialog appears.
33
Sage Fixed Assets Network Installation Guide

Note: If the Verify Database Connection dialog appears, please call Customer Support. There may
be several possible reasons that the system cannot connect to the database.
The Conversion Utility Welcome dialog appears.
6.
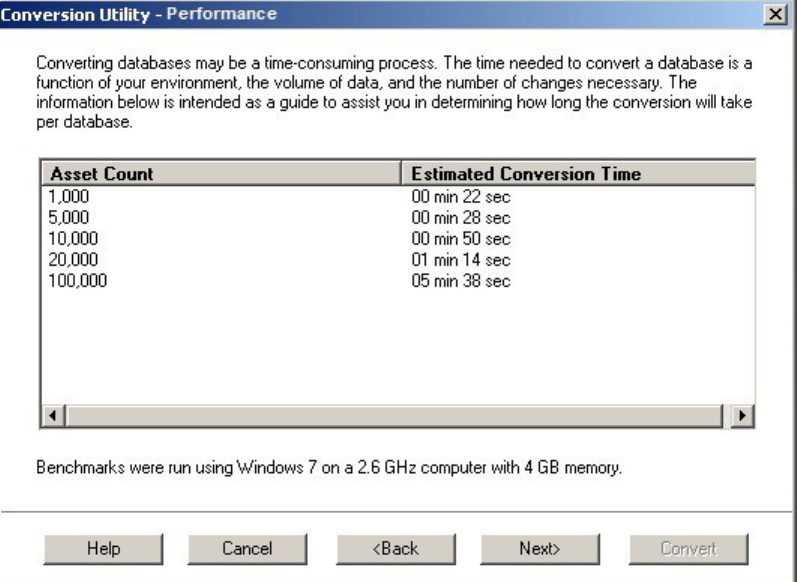
Click the Next button. The Conversion Utility Performance dialog appears.
34
Sage Fixed Assets Network Installation Guide
7.
Review the Performance dialog to estimate how long the database conversion will take.
8.
Click the Next button. The Conversion Utility Select Databases dialog appears.
35
Sage Fixed Assets Network Installation Guide
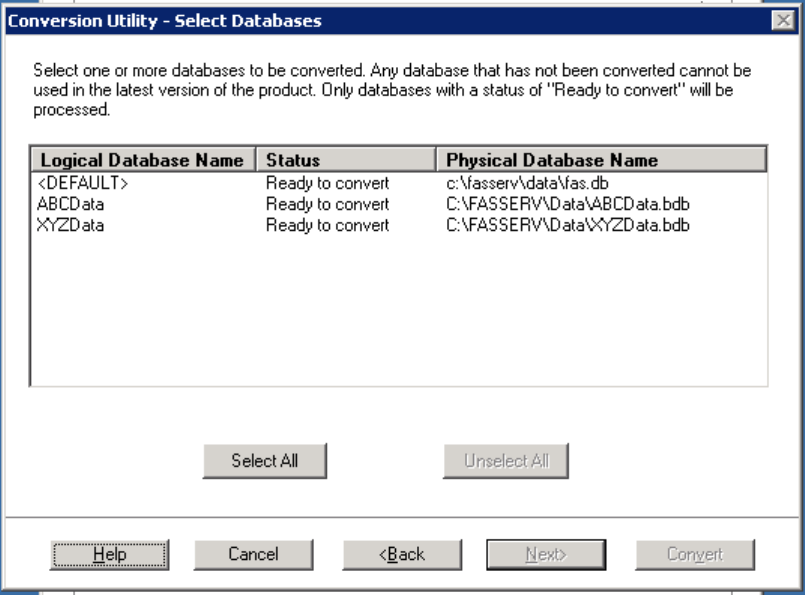
This dialog displays the status of each database.
l
Conversion Complete
This status indicates that the database has already been converted to the latest version.
l
Ready to Convert
This status indicates that the database is ready to be converted to the latest version.
l
Incompatible Version
This status indicates that the database cannot be converted because the database version is
incompatible with the latest version of the application. For assistance in converting your
databases, please contact Customer Support.
l
Cannot Open
This status indicates that the database cannot be converted for an unknown reason. The
database may have been moved and the system cannot locate it, the database may be
corrupted, or the local System account or group does not have Full Control access rights to the
36
Sage Fixed Assets Network Installation Guide
shared folder where the server components are installed. For assistance in resolving the
problem, please contact Customer Support.
9.
Select the database(s) that you want to convert, and then click the Next button. The Conversion
Utility Summary dialog appears.
10.
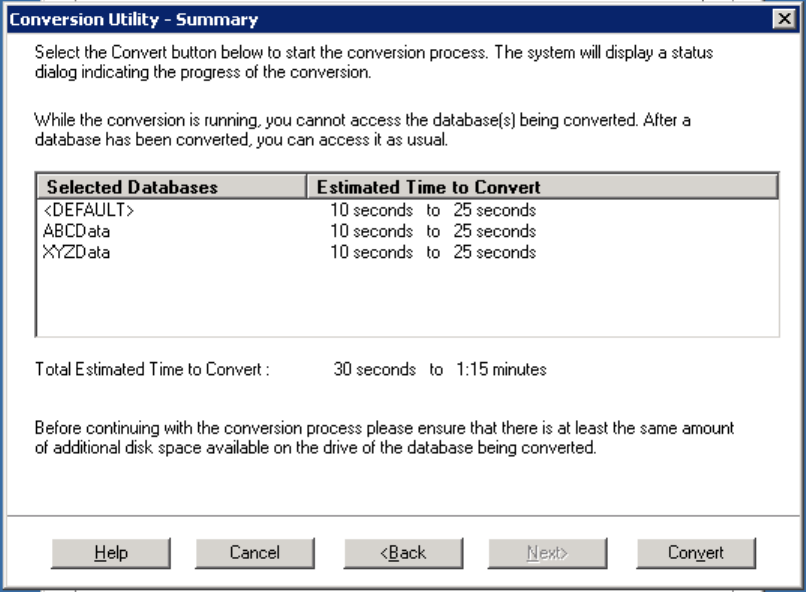
Review the Conversion Utility Summary dialog, and then click the Convert button.
The system checks your computer’s disk space to make sure there is sufficient space to convert
your data. The conversion requires three to four GB of disk space. If there is sufficient space for the
conversion, it begins to convert the database(s) and displays the Conversion Status message box.
37
Sage Fixed Assets Network Installation Guide
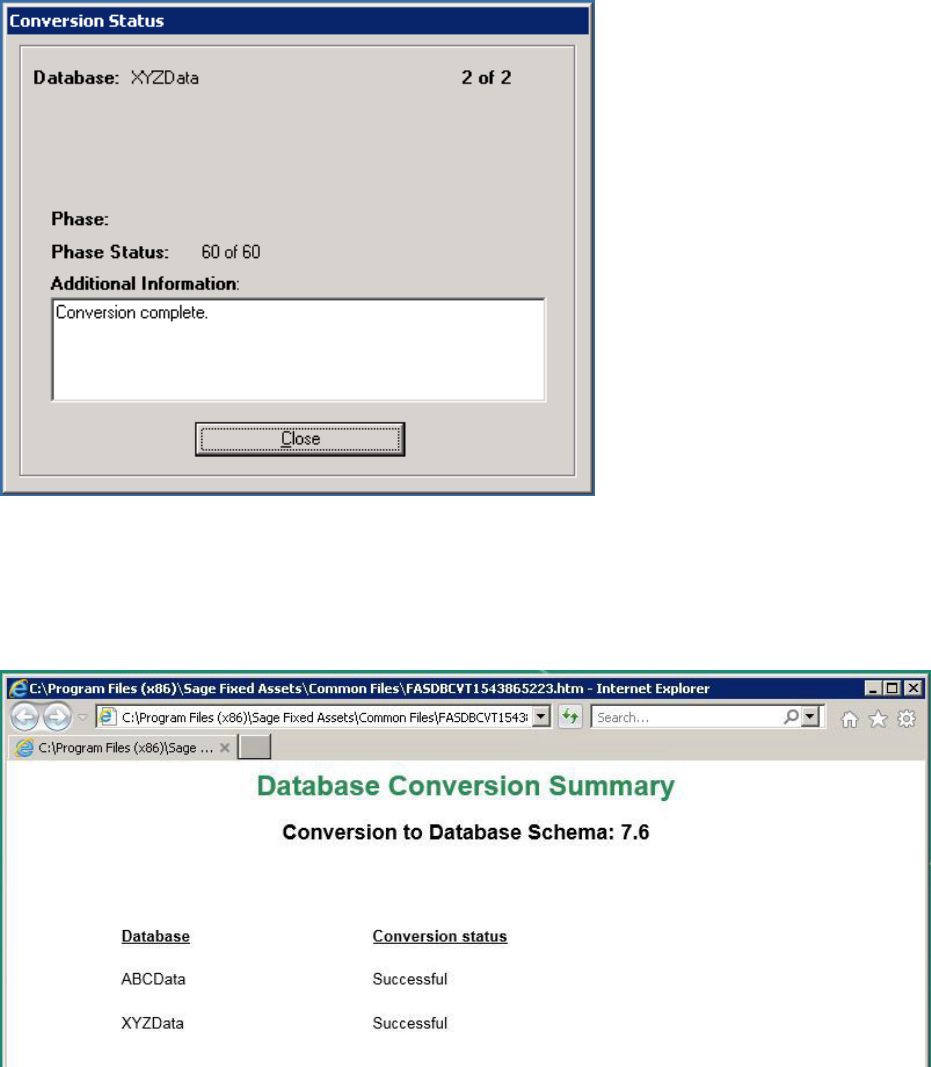
When the conversion is complete, the system displays a “Conversion Complete” message in the
Additional Information text box.
11.
Click the Close button. The system displays the Database Conversion Summary report, which
indicates whether the conversion was successful for each database.
You are now ready to open the database in the latest version of the application.
38
Sage Fixed Assets Network Installation Guide

Chapter 5 Upgrading Sage Fixed Assets
Network Client
This chapter provides instructions for upgrading from a previous version of Sage Fixed Assets
Depreciation.
Upgrading the Client Components
Follow the steps below on each workstation on which you will run the network application. You can also
upgrade the client application on the server for testing purposes.
Before you upgrade the network client, you must share the directory in which you installed the database
server and map a network drive to that directory on each workstation.
To upgrade a client on a workstation
1.
Do one of the following:
l
Go to My Computer and browse to the network drive that you mapped in the previous step.
Locate the folder in which you installed the server components (FASServ, BESTSERV, and
SFAServ are the defaults), and right-click the SETUP.EXE file in the Network Setup subfolder
then select Run as Administrator.
l
Select Start/Run from the Windows taskbar. The Run dialog appears. In the Run dialog, enter
the UNC path (\\Servername\Foldername) to the folder containing the server components.
l
In the Run dialog, enter the mapped drive path to the folder (for example, Z:\SFAServ\Network
Client\SETUP.EXE.
(Substitute your network drive letter for “Z” if it is different.)
Note: If you mapped the Z: drive to \FASServ, \BESTSERV, or \SFAServ, then the path would be:
Z:\Network Client\SETUP.EXE
The system prompts you to install Sage Advisor Update, Sage SBDDesktop, Microsoft .NET
Framework, and Microsoft Visual C++ 2015 Redistributable if it is not already installed before you can
install the application.
2.
Click the Install button. The system installs the required components, and then displays the
39
Sage Fixed Assets Network Installation Guide
Welcome dialog. (You may need to restart your machine.)
3.
Click the Next button. The License Agreement dialog appears. Read the license agreement, and
then click the Yes button to accept the terms of the agreement. (If you do not accept the terms of the
license agreement, click the No button. The system exits from the installation program.)
4.
After you click the Yes button, a message appears indicating that a previous version of the program
has been found on your computer.
5.
Click Yes to remove the previous version of the application. The system removes the prior version
and begins installing the software, and the Setup Status dialog appears.
When all of the files have been installed, the InstallShield Wizard Complete dialog appears.
If the installation program determines that you need to restart your computer before you use the
program, it displays two options on the InstallShield Wizard Complete dialog. You can either allow the
system to restart your computer immediately, or you can restart your computer at a later time.
Tip: We recommend that you allow the system to restart your computer at this time if you are
prompted to do so.
6.
Click the Finish button.
Starting the Application
Follow the steps below to start the network application from a workstation.
Note: You can start the program by double-clicking the icon on your desktop.
To start the application from a workstation
1.
Click the Start button (Windows icon) on the Windows taskbar.
2.
Select the Sage Fixed Assets program group.
3.
Select the icon for the desired product.
Finding your customer number
Your customer number is available in several places:
l
In the email from Sage confirming your Sage Fixed Assets order.
l
On the invoice for your Sage Fixed Assets order.
40
Sage Fixed Assets Network Installation Guide
l
On the Register Window (Help > Registration > Register) if you have previously registered.
l
From your Sage Account Manager at 800-368-2405.
After you have registered your product, your customer number can also be found at Help > Update User
Information.
You will need your Customer Number when contacting Sage for assistance.
41
Sage Fixed Assets Network Installation Guide
Chapter 6 Installing Sage Fixed Assets
Reporting
Sage Fixed Assets Reporting enables you to create custom reports. It is a powerful program that allows
you to design, create, print, and distribute your custom reports.
Note: The latest version of Sage Fixed Assets Reporting uses SAP® Crystal Reports 2016 (Crystal
Reports), which requires 2 GB of hard disk space. A previous version of Sage Fixed Assets
Reporting used Crystal Reports 2011. If this version of Crystal Reports is still on your machine, we
recommend that you uninstall it to avoid conflicts with the latest version.
Note: Sage Fixed Assets Reporting may not be compatible with other versions of Crystal Reports.
Before installing Sage Fixed Assets Reporting, we recommend that you make sure Crystal Reports
2016 is compatible with your other applications that run Crystal Reports.
Installing the Latest Version
Before you begin to install the application, you should do the following:
l
Close all other Windows programs.
l
Close all tool bars on your computer’s desktop (such as the Microsoft Office tool bar).
l
Close all programs that run in the background after you start your computer (such as virus-checking
programs).
l
Make sure you have Administrative rights to the local computer.
When installing the application, we recommend you accept the default options and directory locations the
installation program provides. However, you can customize the installation to suit your needs by choosing
the components you want to install.
42
Sage Fixed Assets Network Installation Guide
To install Sage Fixed Assets Reporting
1.
Select Start/Run from the Windows taskbar. The Run dialog appears.
l
Browse
Click this button to select the SETUP.EXE file.
The default directory path is Z:\SFAServ\Crystal\SETUP.EXE. (Substitute your network drive letter
for “Z” if it is different.)
Note: If you mapped the Z: drive to \SFAServ, then the path would be:
Z:\Crystal\SETUP.EXE.
The SETUP.EXE file is located on the machine on which you installed the server
components.
2.
Click OK.
Note: The SFA reporting server must be installed in order to install Sage Fixed Asset Reporting.
For more information, see “Step 5: Installing the Sage Fixed Assets Reporting Server Components
(Optional)”, on page 13.
3.
Click the Next button to continue. The Welcome dialog appears.
43
Sage Fixed Assets Network Installation Guide
4.
Click the Next button. The system displays the License Agreement. Select the I Accept the License
Agreement option button, and then click the Next button. The system displays the Specify the
Destination Folder dialog.
5.
The system displays the Select Install Type dialog.
44
Sage Fixed Assets Network Installation Guide
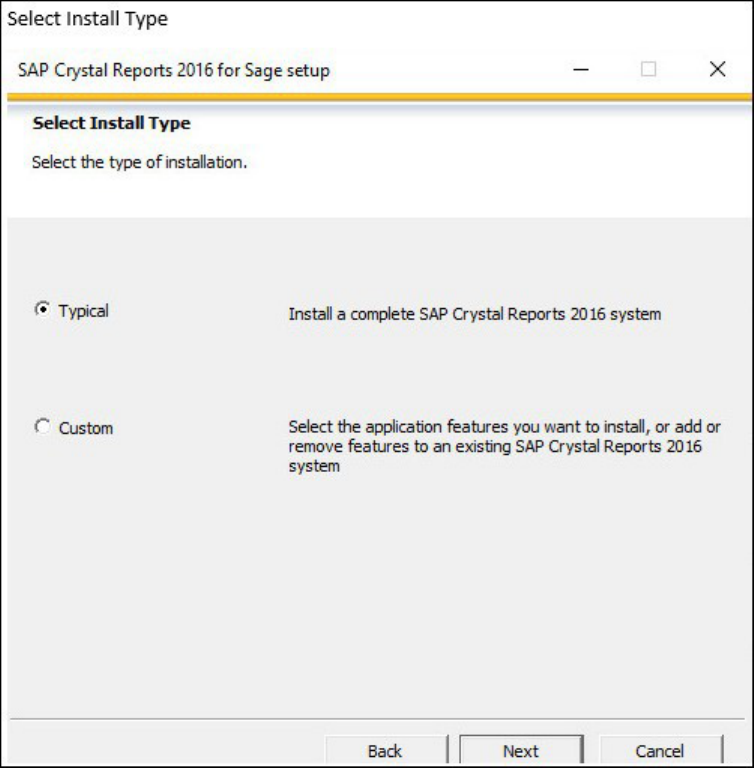
6.
Leave the Typical option selected, and then click the Next button. The system displays the Start
Installation dialog. Click the Next button. The system begins installing the program and displays the
installation progress dialog.
7.
When the installation is complete, a message indicates the installation has been completed
successfully.
8.
Clear the Check for Product Updates button.
9.
Click the Finish button. The system displays the InstallShield Wizard Complete dialog.
10.
Click the Finish button. The system returns to the Client Installation dialog.
11.
Click the Exit button to close the dialog.
45
Sage Fixed Assets Network Installation Guide


Chapter 7 Using a Barcode Scanner
Sage Fixed Assets—Network Tracking enables you to conduct inventories of your assets using a Barcode
Scanner.
The Sage Fixed Assets Scanner app provides an efficient way to complete inventories using an Android
Barcode Scanner. You can find the Sage Fixed Assets Scanner app in the Google Play Store.
For more information see the Sage Fixed Assets Scanner FAQs at the following link:
https://support.na.sage.com/selfservice/viewdocument.do?externalID=84158
47
Sage Fixed Assets Network Installation Guide
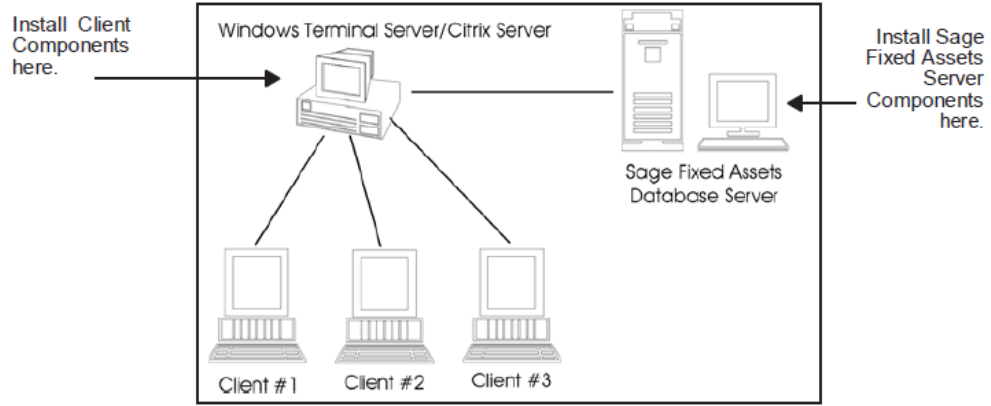
Chapter 8 Installing in a Microsoft Windows
Terminal Server
To manage fixed assets at a central location and provide remote users with access to fixed asset data, you
can install the application on a Windows Terminal Server (WTS).
The Sage Fixed Assets application works best in a Windows Terminal Server when you install it in a “three-
tiered” configuration; that is, where the Database Server and the Client are on separate servers.
Three-tiered Environment
To install in a three-tiered environment
Perform these steps on the Database Server:
1.
Perform the network server installation on the server that will run the database engine.
2.
Share the SFAServ directory so that you can perform the client installation on the Windows Terminal
Server.
Perform these steps on the WTS:
48
Sage Fixed Assets Network Installation Guide
1.
Map a drive to the shared directory SFAServ on the Database Server. Windows Server 2008:
Click the Install Application on Remote Desktop Server.
2.
Click the Browse button and select the SETUP.EXE file in the SFAServ\Network Client folder on the
server.
3.
On the Run Installation Program dialog, click the Next button. The Sage Fixed Assets client
installation dialog appears.
4.
Follow the instructions on the installation dialogs. After you install the client components, the After
Installation dialog appears.
5.
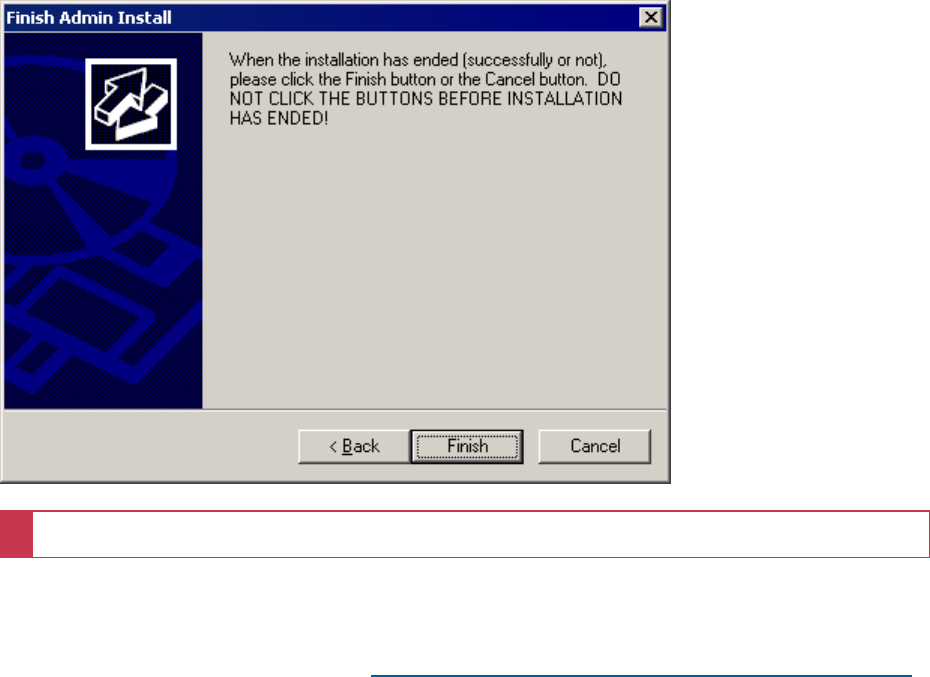
After the installation is complete, click the Next button. The Finish Administration Install dialog
appears.
IMPORTANT: Do NOT click the Finish button before the installation has completed!
6.
Click the Finish button.
You are now ready to set up the client workstations. For instructions on installing the Sage Fixed
Assets Network client components, see "Chapter 3, Installing Sage Fixed Assets Network Clients",
on page 24.
For information on setting up your client workstations to run the application, please refer to your
Microsoft Terminal Server documentation.
49
Sage Fixed Assets Network Installation Guide
50
Sage Fixed Assets Network Installation Guide

Chapter 9 Managing a Sage Fixed Assets
Database Service
When you install the Database Server, the system creates a database service with default parameters.
You can edit the default parameters if needed.
Editing the Database Service
To edit the database service
Note: You must run the utilities as an Administrator.
1.
Click the Start button on the Windows taskbar, and then select Programs (or All Programs) from the
Start menu.
2.
Select the Sage Fixed Assets program group.
3.
Select the Tools program group.
4.
Select the Database Utility Network icon. The Database Utility dialog appears.
5.
Click the Service Manager button. The system displays the Sage Fixed Assets Service Manager
dialog.
51
Sage Fixed Assets Network Installation Guide
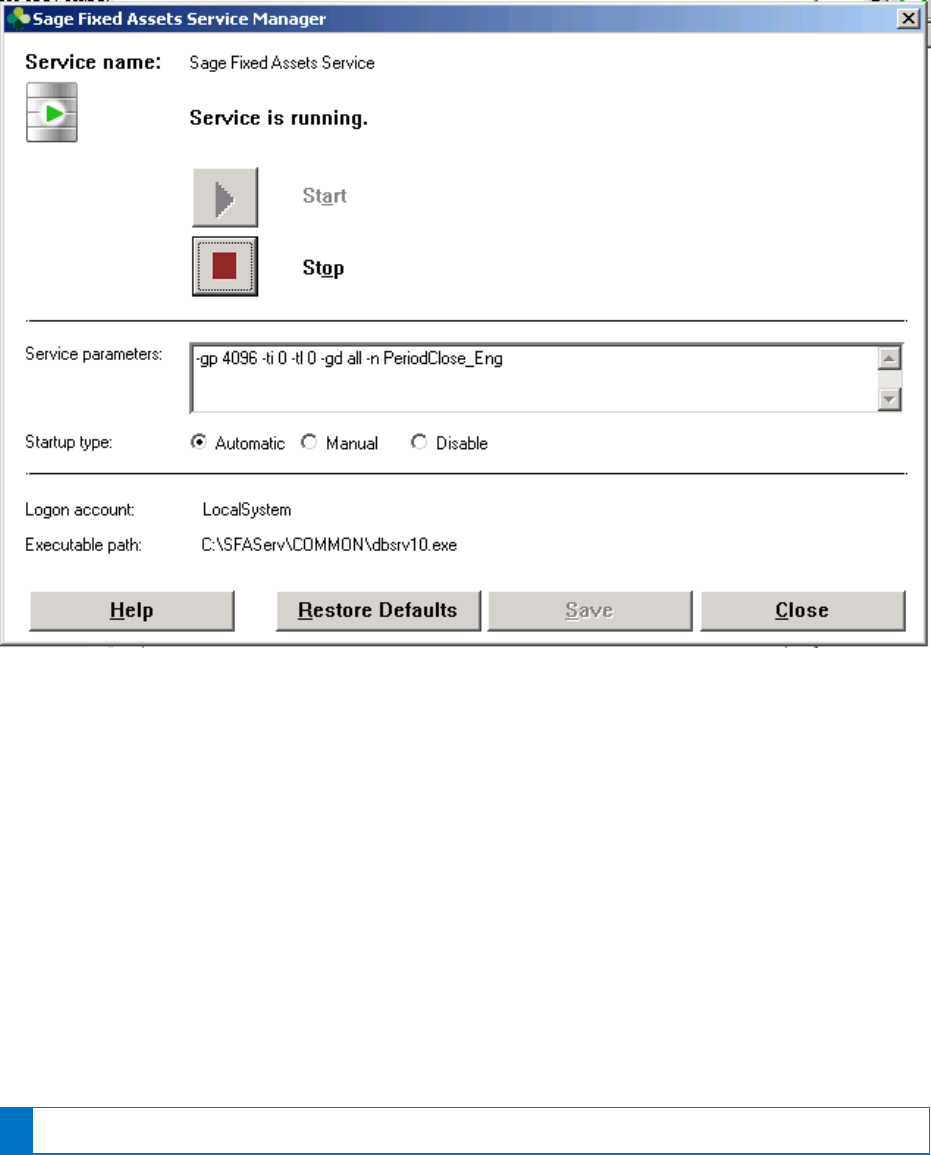
A service name of Sage Fixed Assets Service is required. You cannot change the name of the
service.
6.
Edit the default parameters in the Parameters field, if desired. If you want to specify a particular
protocol, enter the following:
-gp 4096 -ti 0 -tl 120 -gd all -x protocol -n SageFAS_Engine
where “protocol” is the communication protocol you selected when you installed the Database
Server components.
Protocol = tcpip*
Command = tcpip{myip=xxx.xxx.xxx.xxx;dobroadcast=no}
* When you are entering the TCPIP parameters, replace XXX.XXX.XXX.XXX with the server’s IP
address.
Note: The fifth parameter, -tl, contains the letter “L,” not the number one.
52
Sage Fixed Assets Network Installation Guide
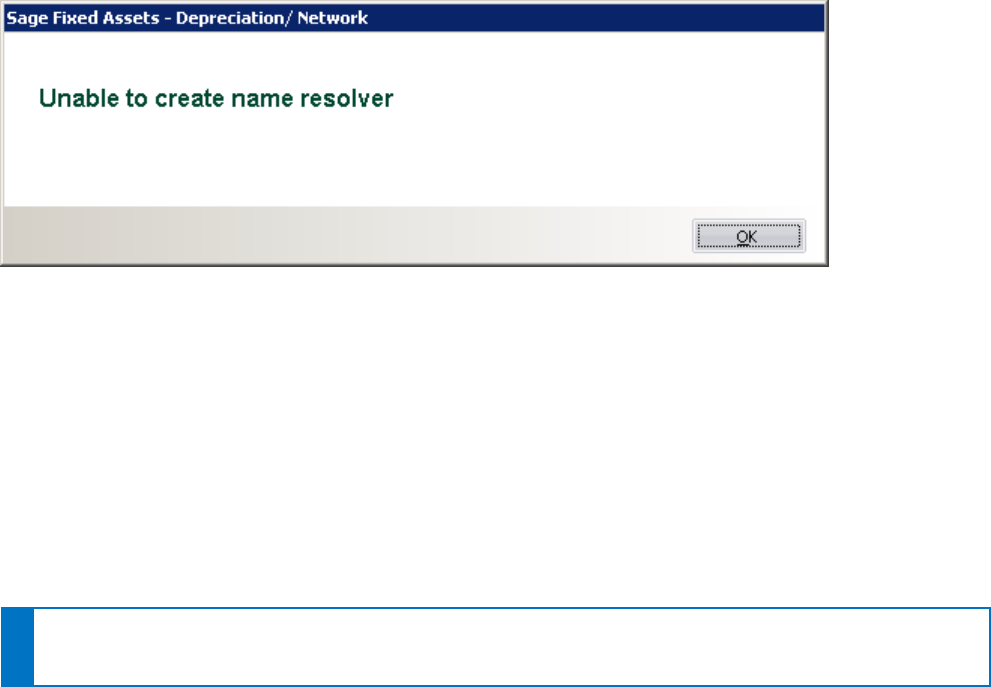
Appendix Troubleshooting
Changing Permissions on Windows
Why do I receive a No Name Resolvers Error?
When running Sage Fixed Assets Depreciation Network on Windows, users who do not have local
Administrator privileges to their own machines may receive an error message similar to the one shown
below.
This message occurs because the application attempts to open the registry with read/write access. Users
who do not have Administrator privileges to their own machines do not have this access by default. The
problem can be resolved in one of two ways:
l
Make each user who will be using the application a member of the Administrators group on the
machine where the application is installed. Consult your Windows documentation for more
information on groups and user rights.
l
Change the permissions on the Best Software key in the Windows Registry.
To change the permissions
Note: You should perform the steps below only if you are familiar with the Windows Registry. Please
contact your local IT administrator or Help desk for assistance if needed.
You should be logged on as an Administrator before you complete the steps below.
1.
Select Start/Run from the Windows taskbar. The system displays the Run dialog.
2.
Enter either REGEDT32.EXE or REGEDIT.EXE in the Open field. (Either one will work.) The system
53
Sage Fixed Assets Network Installation Guide
displays the Registry Editor.
You need to grant Full Control Access to the following registry key: Hkey_Local_
Machine\Software\Best Software
3.
Navigate to this key to grant the permissions.
4.
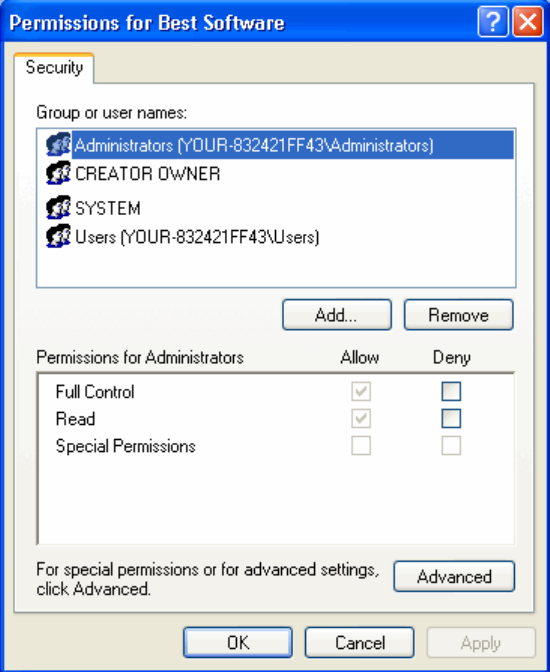
Right-click on the Best Software key and select Permissions from the pop-up menu. The system
displays the Permissions for Best Software dialog.
5.
Click the Advanced button. The system displays the Advanced Security Settings for Best Software
dialog.
54
Sage Fixed Assets Network Installation Guide
6.
Clear the Inherit from Parent the Permission Entries that Apply to Child Objects check box. The
system displays a Security message box.
7.
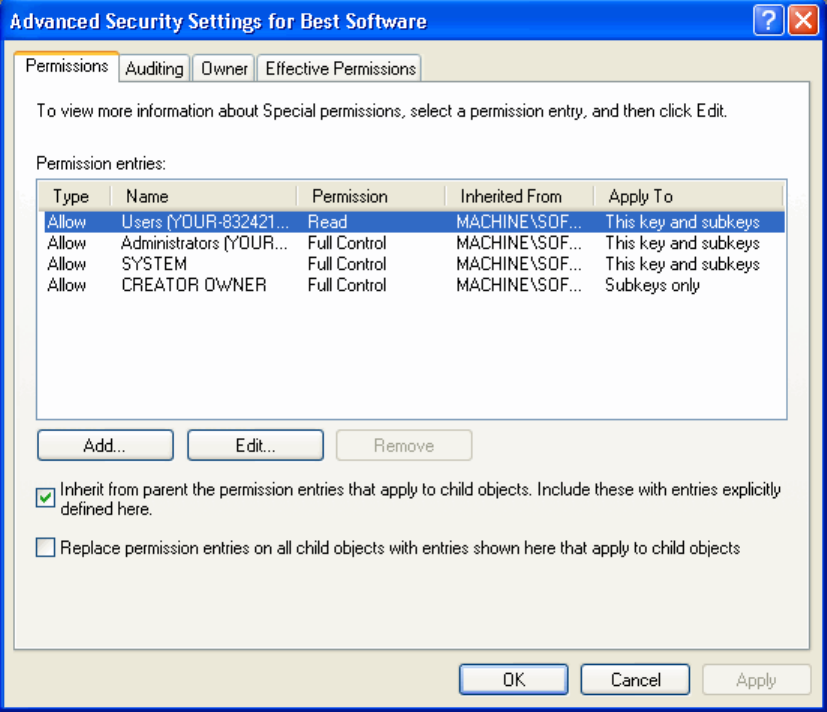
Click the Copy button. The system returns to the Advanced Security Settings for Best Software
dialog.
8.
Click the Add button. The system displays the Select User or Group dialog.
55
Sage Fixed Assets Network Installation Guide
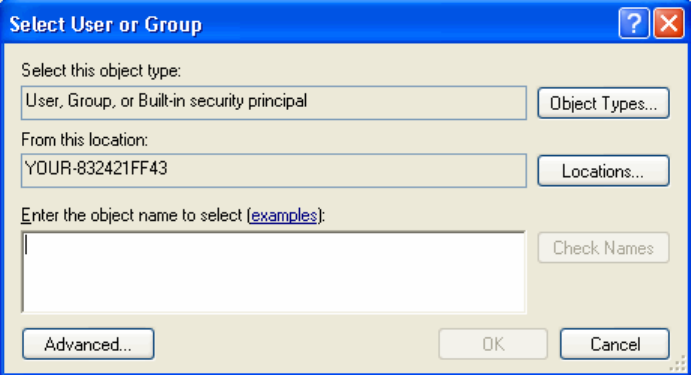
9.
Click the Advanced button to access the advanced features on the dialog.
10.
Click the Find Now button.
11.
Hold down the CTRL key, and select the Everyone and System groups, and then click OK to close
the dialog. The system returns to the Select User or Group dialog.
12.
Click OK again. The system displays the Permission Entry for Best Software dialog.
56
Sage Fixed Assets Network Installation Guide
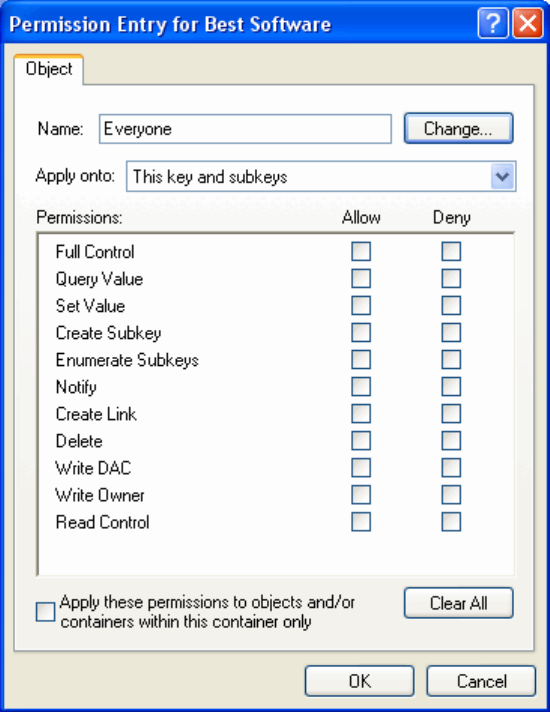
13.
Select the Full Control check box in the “Allow” column, which selects all of the check boxes in the
column.
14.
Click OK to return to the Advanced Security Settings for Best Software dialog.
15.
When you return to the Advanced Security Settings for Best Software dialog, make sure that the
Everyone and System groups have Full and Read Control access.
16.
Click the Replace Permission Entries on all Child Objects check box.
17.
Click the Apply button. The system displays a Security message box.
18.
Click the Yes button to continue. The system returns to the Advanced Security Settings for Best
Software dialog.
19.
Click OK again. The system returns to the Permissions for Best Software dialog.
20.
Click OK to close the Permissions for Best Software dialog. The system returns to the Registry
57
Sage Fixed Assets Network Installation Guide
Editor.
21.
Select File/Exit to exit from the Registry Editor.
22.
Log off and log back in as the user. You should be able to access the application now.
Adding a Database to the System
How do I add a database to the Database List Manager?
You may need to move a database from a workstation to a network drive or move a database from one
computer to another. After you move the database, you will need to let the application know the location of
the database by adding it to the Database List Manager.
The recommended procedure is to perform a company backup from the old system and then do a
Company Restore onto the new system. However, if this is not an option, it is possible to copy the BEST.DB
or *.BDB file to the new location and use Database List Manager to associate the moved files with the new
system.
To add a database to the system
1.
Install the application onto the new server.
2.
Configure and start the Sybase SQL Service.
3.
If the existing server and service will be running for the interim, either use different engine name (the
-n parameter), or stop the original Service/NLM before proceeding. Please refer to the Installation &
Administration Guide for more specific details about service parameters.
On the workstation:
4.
Uninstall any previous Sage FAS Fixed Assets applications.
5.
In the Control Panel, select Add/Remove Programs.
6.
Install the Sage Fixed Assets client from the new server.
7.
Open the application on the workstation and connect to the default company to insure connectivity
with the new server.
8.
Copy only the BEST.DB or *.BDB file(s) the new folders on the new server or workstation. (Do not
overwrite the default database.)
9.
Use Database List Manager to reassociate the copied databases to the new system. You will now be
able to open the companies within the databases.
58
Sage Fixed Assets Network Installation Guide

Copying Configuration Settings
Why am I unable to connect to the system database?
You may find that one workstation is unable to connect to the database on the server, while another
workstation is able to do so. When you attempt to connect to the server, you see a Service Provider dialog.
Solution 1:
The solution may be: Change the XXX.XXX.XXX.XXX in the Parameters field to the IP address or the
server name of the server.
Solution 2:
The problem may be the type of pathing that each workstation uses to access the server. The Service
Provider dialog may require either a local server pathing (X:\FASSERV) or a UNC pathing
(\\SERVER\SHARE\FASSERV), depending on how the server rights are configured.
The procedures below may be useful if one workstation can access the server while another server
cannot. The steps describe how to copy the Sage FAS configuration settings from the working computer to
the non-working computer. These settings are stored in the Windows Registry.
Note: You should perform the steps below only if you are familiar with the Windows Registry. Please
contact your local IT administrator or Help desk for assistance if needed.
To copy configuration settings
1.
On the working client workstation, select Start/Run.
2.
In the Run dialog, enter REGEDIT, and then click OK.
3.
Browse to the following key: HKEY_LOCAL_MACHINE\SOFTWARE\Best Software\NWBESTSYS.
4.
Write down the Data values for the following keys:
l
ENGINENAME
l
LOGICALNAME
l
PARAMETERS
l
PROTOCOL
5.
On the non-working client workstation, and repeat steps 1 through 3.
6.
Compare the Data values for the four keys in step 4. If any of the keys differ from the working
59
Sage Fixed Assets Network Installation Guide
computer, double-click on the key to get the Edit String window and change the value to match the
value on the working computer.
For example, the LOGICALNAME can be either UNC or Drive letter. If the working computer is using
Drive letter, then change the non-working client workstation to match it.
Drive Letter = C:\FASSERV\BESTSYS.DB (use the actual drive letter the on which the program was
installed to the server)
UNC = \\SERVERNAME\FASSERV\BESTSYS.DB
7.
Close the registry editor.
8.
Launch the Sage FAS Fixed Assets client application.
Moving the Application to a New Server
How do I move the application to a new server?
Follow the instructions below to move the application to a new server machine.
Note: Before you follow the instructions below, make sure you have first backed up your databases.
You can use your normal network backup procedures, or you can select File/Company
Utilities/Backup Company from the menu bar on the client machine.
The instructions below assume you are moving the same version of the program to the new server
machine.
To move the application to a new server
1.
Stop the Sybase SQL Service on the old server.
2.
Install the program on the new server. For complete instructions, see “Step 1: Installing the Sage
Fixed Assets Network Server Components”, on page 2.
3.
On the client workstation, uninstall any previous Sage Fixed Assets client applications (if applicable).
The uninstall will remove only application files and will not remove custom reports, configuration, or
database files.
4.
Install the network client. For complete instructions, see “Step 1: Installing the Client Components”,
on page 24.
5.
On the client workstation, use Database List Manager to create a new database.
6.
Restore the backup files. (Select File/Company Utilities/Restore Company.) Select one of the newly
60
Sage Fixed Assets Network Installation Guide

created databases for the location of the restored company.
You should now be able to open your companies.
Replacing the Configuration Database
What do I do if I cannot use Database List Manager?
If the configuration database (BESTSYS) becomes corrupted, you will be unable to locate, add, or remove
databases in Database List Manager. Follow the instructions below to replace the configuration database.
Note: Security information will be lost by replacing the BESTSYS.DB file.
To replace the configuration database
1.
Verify the path to the BESTSYS.DB.
2.
Make sure that the user account being used for the service has FULL CONTROL to the FASserv
folder on the server.
3.
Shut down the Sybase SQL Engine on the server.
4.
In Windows Explorer, browse to the FASserv folder on the server.
5.
Rename the BESTSYS.DB file.
6.
Rename the BESTSYS.LOG file.
7.
Copy the BESTSYS.SAV file, and then paste it into the same directory to create a Copy of
BESTSYS.SAV.
8.
Rename the Copy of BESTSYS.SAV to BESTSYS.DB.
9.
Restart the Sybase SQL Engine.
10.
On the client workstation, launch the Sage FAS Fixed Assets application.
11.
If you are prompted to enter your Contact information, click Close.
12.
If you are asked to register the application, click Register Later.
A dialog appears with a message that “An error occurred while attempting to open the selected
database,” and the list of databases is empty.
13.
Click the DB MGR button.
14.
Add the existing databases to the list.
61
Sage Fixed Assets Network Installation Guide

Note: The BESTSYS.DB file may have become corrupted if the application connects to a corrupt
database file. In this case, troubleshoot by adding a known good database or create a new
database. One at a time, add and open each database to see if the application encounters an error.
The BESTSYS.DB can be backed up by copying it after each database is added until an error
occurs. In this way, if the BESTSYS.DB becomes corrupted again, you can follow the steps above to
replace the BESTSYS.DB. However, you can use the backup copy of BESTSYS.DB instead of the
BESTSYS.SAV file. Restore any databases from a backup that produce an error in the application.
62
Sage Fixed Assets Network Installation Guide
